
webOS와 websocket을 이용하여 LED 제어하기 2 : ESP와 LED ↔ server 를 참고하면 이해를 도울 수 있습니다.
- 전체 시스템 소개
- 조명 제어
- 스마트 가습기
- 수면 패턴 분석
- 시스템 연동
ESP8266 보드 설정
ESP8266 보드 설정은 webOS를 활용한 HomeIoT : 가습기1 - 디바이스 글을 참고하여 해줍니다.
회로구성
코드 설명
1. 서버 코드
from simple_websocket_server import WebSocketServer, WebSocket
import json


class webos_IOT(WebSocket):
    def handle(self):
        # echo message back to client
        print('Receive:', self.address, self.data)
        req = json.loads(self.data)
        print(req['msgType'], req['deviceType'], req['deviceID'], req['value'])

        res = {
            'msgType': req['msgType'],
            'deviceType': req['deviceType'],
            'deviceID': req['deviceID'],
            'value': req['value']
        }
        self.send_message(json.dumps(res, indent=4))

    def connected(self):
        print(self.address, 'connected')

    def handle_close(self):
        print(self.address, 'closed')


server = WebSocketServer('10.50.51.133', 9999, webos_IOT)
print('Server runs @', '10.50.51.133', 9999, 'webos_IOT')
server.serve_forever()
먼저, 서버와 클라이언트가 잘 연결되는지 테스트하기 위한 서버 코드를 파이썬을 이용해 작성합니다.
WebSocketServer 첫번째 인자에는 각자의 서버가 연결된 ip 주소로 변경해줍니다.
ip 주소는 명령창에 ipconfig 명령어를 통해 확인 할 수 있습니다.
그리고 포트 번호도 설정해줍니다. 본 예제에서는 '9999'으로 설정했습니다.
ESP보드와 서버가 통신할 때에는 JSON 문자열 포맷으로 데이터를 주고받습니다. 이 때문에 'json.loads'를 통해서 res를 다시 파이썬 객체로 바꾸어줍니다.
물론 서버에서 클라이언트로 메세지를 보낼 때에는 'json.dumps'로 json 포맷으로 바꾸어 전송합니다.
2. 클라이언트 코드
#include <ESP8266WiFi.h>
#include <WebSocketClient.h>
#include <ArduinoJson.h>
#include <string.h>

// wifi 연결 정보
const char* ssid     = "Seoultech_dream";
const char* password = "";

// 서버 접속 정보
char path[] = "/";
char host[] = "10.50.51.32";
int port = 9999;

// Use WiFiClient class to create TCP connections
WiFiClient client;
WebSocketClient webSocketClient;

StaticJsonDocument<200> jsonObj;

int i=0;

void setup() {
  Serial.begin(115200);
  delay(10);

  // We start by connecting to a WiFi network
  Serial.println();
  Serial.println();
  Serial.print("Connecting to ");
  Serial.println(ssid);

  WiFi.begin(ssid, password);

  while (WiFi.status() != WL_CONNECTED) {
    delay(500);
    Serial.print(".");
  }

  Serial.println("");
  Serial.println("WiFi connected");
  Serial.println("IP address: ");
  Serial.println(WiFi.localIP());

  delay(1000);

  // Connect to the websocket server
  if (client.connect(host, port)) {
    Serial.println("Connected");
  } else {
    Serial.println("Connection failed.");
    while(1) {} // hang on failure
  }

  // Handshake with the server
  webSocketClient.path = path;
  webSocketClient.host = host;
  if (webSocketClient.handshake(client)) {
    Serial.println("Handshake successful");
  } else {
    Serial.println("Handshake failed.");
    while(1) {} // Hang on failure
  }
}

void loop() {
  String data;
  if(client.connected()){
    int sensorValue = analogRead(A0);
    // websocket으로 data를 보낸다.
    wsSendData(0, sensorValue);

    webSocketClient.getData(data);
    if(data.length() > 0) {
      Serial.print("From server: "); Serial.println(data);
    }
  }// end of if-client.connected
  delay(2000);
}

void wsSendData(int index, int value) {
  String deviceID = "Sleep0" + String(index);

  jsonObj["msgType"] = "sendValue";
  jsonObj["deviceType"] = "sleepSensor";
  jsonObj["deviceID"] = deviceID;
  jsonObj["value"] = value;

  String jsonString;
  serializeJson(jsonObj, jsonString);
  webSocketClient.sendData(jsonString);
  jsonObj.clear();
}
다음으로 ESP8266 보드에 업로드 할 클라이언트 코드를 Arduino에 작성합니다.
서버코드에서 수정했던 것 처럼 와이파이 주소와 비밀번호 및 포트를 바꾸어줍니다.
json 포맷으로 통신하기 위해 ArduinoJson 라이브러리를 다운받아주는 등 위 코드의 헤더파일을 저장해줍니다.
시리얼 모니터에 'Handshake successful' 문구까지 출력되었다면 서버와 클라이언트의 연결이 성공한 것입니다.
void loop() {
  String data;
  if(client.connected()){
    int sensorValue = analogRead(A0);
    // websocket으로 data를 보낸다.
    wsSendData(0, sensorValue);

    webSocketClient.getData(data);
    if(data.length() > 0) {
      Serial.print("From server: "); Serial.println(data);
    }
  }// end of if-client.connected
  delay(2000);
}

void wsSendData(int index, int value) {
  String deviceID = "Sleep0" + String(index);

  jsonObj["msgType"] = "sendValue";
  jsonObj["deviceType"] = "sleepSensor";
  jsonObj["deviceID"] = deviceID;
  jsonObj["value"] = value;

  String jsonString;
  serializeJson(jsonObj, jsonString);
  webSocketClient.sendData(jsonString);
  jsonObj.clear();
}
analogRead를 통해 A0으로부터 압력센서의 값을 받아옵니다.
압력센서의 값은 센서의 압력에 따라 0에서 1024까지 변화합니다.
이를 json 포맷으로 바꾸어 서버에 전송합니다.
Websocket Sever와 Test통신
TestServer열기
python [server.py]다음 코드를 실행하여 파이썬 서버를 열어줍니다.
Arduino에서 클라이언트 코드를 esp보드에 업로드 합니다.
다음, 시리얼 모니터를 통해 서버와 클라이언트가 통신을 잘 하는지 확인해줍니다.
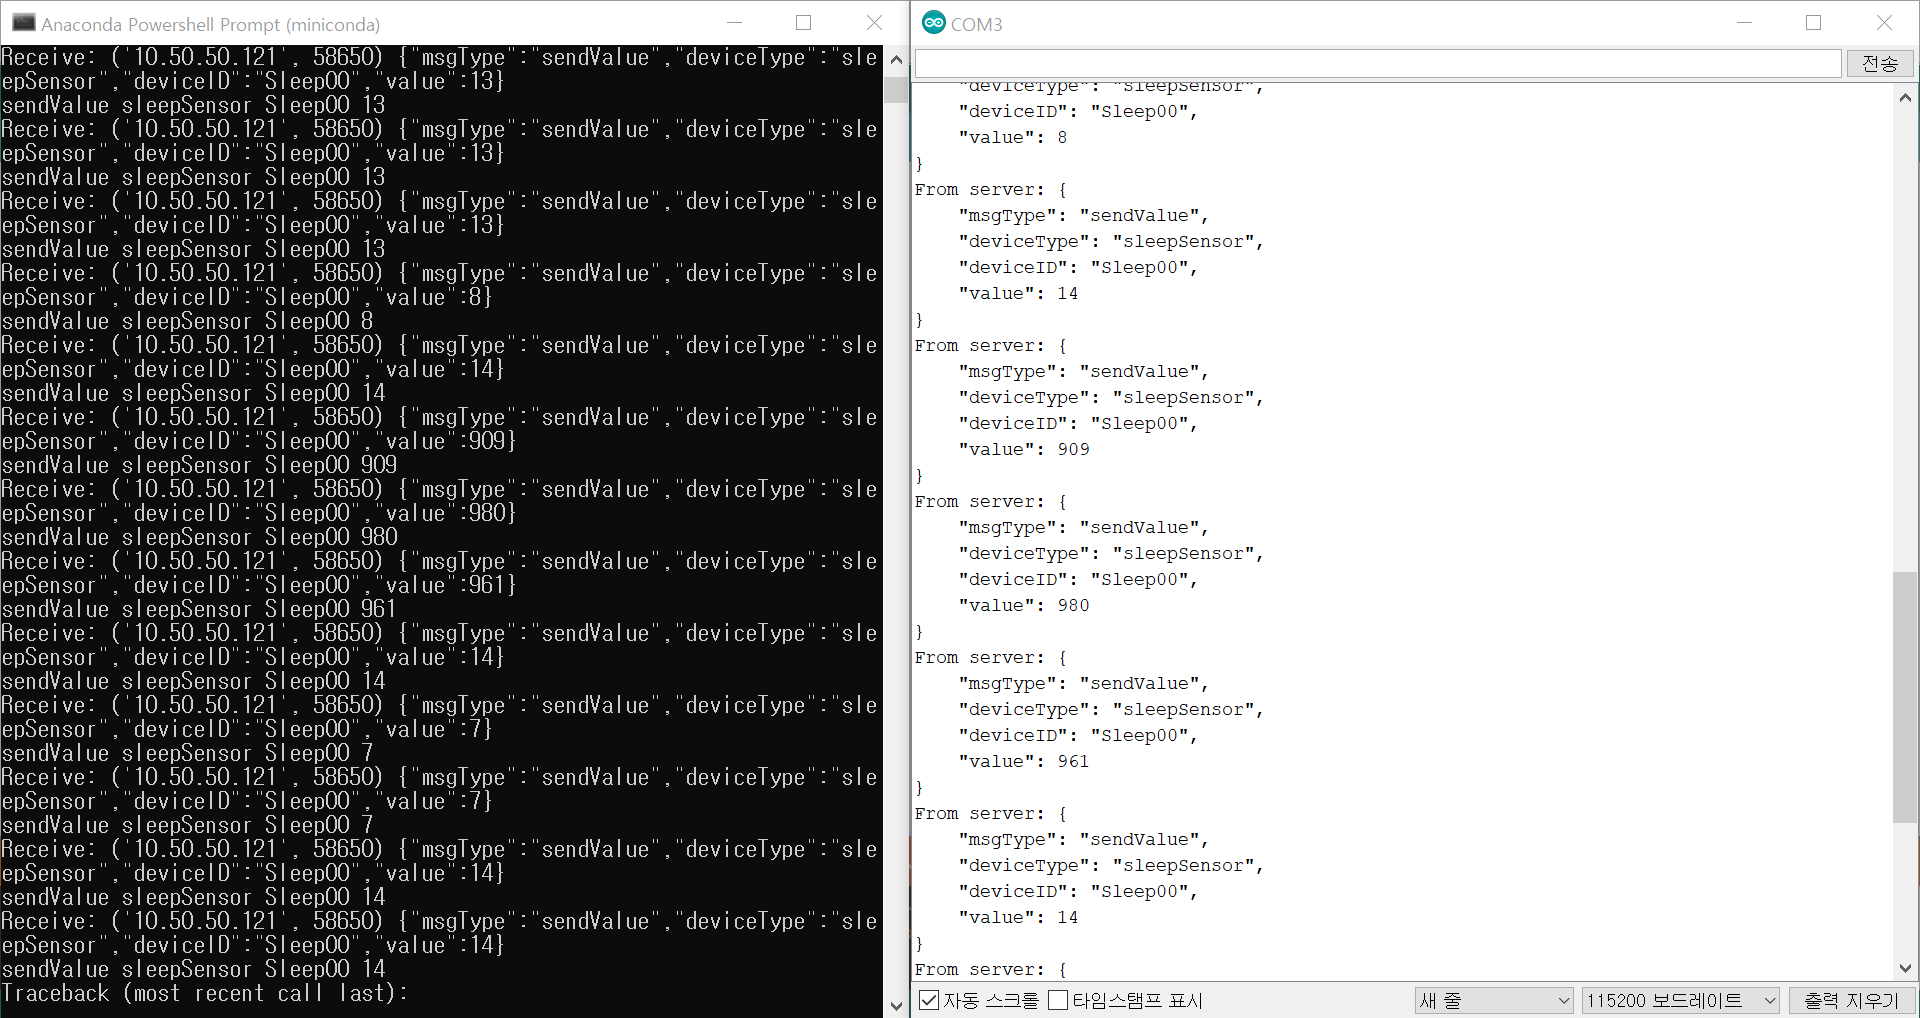
압력센서의 값에 따라 값을 잘 주고 받는 것을 확인 할 수 있습니다.
'webOS 프로젝트' 카테고리의 다른 글
| webOS를 활용한 HomeIoT : 수면패턴분석3 - 서비스 (0) | 2021.11.27 |
|---|---|
| webOS를 활용한 HomeIoT : 수면패턴분석2 - Enact App (0) | 2021.11.27 |
| webOS를 활용한 HomeIoT : 스마트 가습기3 - 서비스 (0) | 2021.11.27 |
| webOS를 활용한 HomeIoT : 스마트 가습기2 - Enact App (0) | 2021.11.27 |
| webOS를 활용한 HomeIoT : 스마트 가습기1 - 디바이스 (0) | 2021.11.27 |